Monday, July 26, 2010

Monsters for Monday


I just finished making these cute little monster tags. They were on a tissue box of all things but I couldn't bear to throw them into the recycling without doing some of my own recycling first!

They are so sweet and will be perfect for gifts for kids and the young at heart. They'll be great for scrapbooking and other projects too. The possibilities are endless!

I'm happy I spotted these cuties :)
You can find them in my shop


Saturday, July 24, 2010

Tutorial - Painting a Portrait (Part II)

If you missed Part 1, start here.


Once I get the grid on the canvas and the image sketched into the lines, the fun can begin!

I always start with the "easiest" part first, which is the larger areas with less detail. If I do this, I can see progress on the portrait more quickly and it helps to give me vision on what the final product will be. Personally, I find it more difficult to start on the details of a face because I can't tell if it is in perfect proportion to the other characteristics of the person, like jaw structure and shape of the head, but I do know other artists who prefer to start with the face and work outwards. It's a matter of personal preference really.

With this portrait, I filled in the background first and then started on the jacket, working from left to right because I am right-handed.


The nice thing about oil paint is that it stays wet longer which makes it easier to shade and blend. I like that I can take my time and can occasionally step back from the painting to get a different perspective.

I left out doing the finer details, like doing the zipper and his name. I prefer to do these fine details on top of the paint when it's dry because the lines will be crisper.


After this, I start to work on the face going from "easiest" to "most difficult". I start with the neck, chin, cheeks,nose, and forehead.


Now it's time for the detailed parts. I do the ears and eyebrows first. Then I do the eyes, and finally the mouth. When doing the face, I always save the mouth for last. It's amazing how much the smile can make or break a portrait and it is actually a very tricky part to paint. The proportions of each tooth must be absolutely perfect.

Sometimes, I find it easier to paint the mouth by turning the canvas upside-down. It changes my perspective on painting it. I no longer think of it as a mouth but as a combination of geometric shapes and angles. If you are running into frustrations in painting a specific part, try turning the canvas upside-down. Sometimes it will surprise you how far "out" you were in your measurements. It's amazing how it will all come together. This was one of the best tips I ever got from another artist; and now I'm sharing it with you :)

I leave the hair as the last structure to paint. I do this for two reasons, 1) It's a bit easier than the details of the face and I use it as a kind of reward for getting the face correct and 2) it's a structure that can be painted over top of other elements in the painting, like the ears, forehead and background. This helps to give it depth.
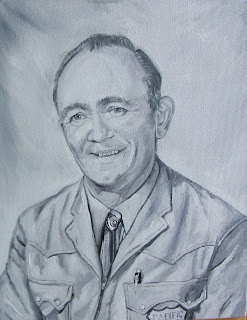

Lastly, I do final touch-ups. In this painting, it was the name on his shirt, the zipper, and the highlights on the pupils of his eyes. By this point, the paint has dried enough for me to do these delicate details.


And here's a photo of the final product!
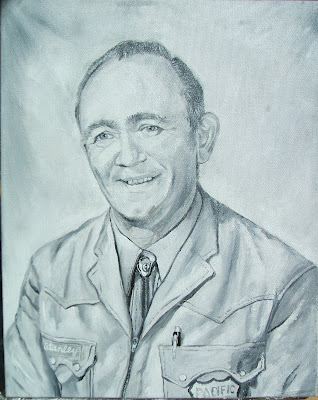

Now all it needs to do is dry out completely before I send it to the customer!
If you're reading this, thanks for sticking with me all the way to the end; I know it was a long one but hopefully you've enjoyed seeing the process and maybe gotten some tips too for your own work. I would love to hear any comments or questions you might have :)

Happy painting!

Tutorial - Painting a Portrait (Part I)

When people see my portraits, they often ask, "How do you do that?" Fortunately, I just finished a custom portrait so I can show you! I took pictures throughout because I thought it would be a good opportunity to show others my process.

First, I start with a photograph and a blank canvas. For this particular portrait, the canvas is 11x14 inches and the photo is 5x7 inches.


Now because the ratios of the canvas and the photograph are different, I have to make some adjustments to the photo. The ratio of the canvas is 11x14 but the photo is 5x7 inches. If I double the photo size, the ratio will be 10x14 inches which means that we are short by 1 inch in the width- I have to make the photo wider to compensate. I am going to make it half an inch wider so that when I double it, it will equate to that missing inch; this makes the scales of the photo and canvas the same (5.5x7 is the same as 11x14)


Next, I have to draw the grids on. Starting on the width of the photo, I divide it exactly in half with a vertical line. Then I divide those two halves into half again, and then again until the photo has been divided into eighths. Depending on the detail of the photo, I may divide it into sixteenths. I did this in the area of the face.

Then, I do the same thing to the height of the photo, dividing it into equal parts with horizontal lines until it is divided into eighths.


Next, I draw the grid onto the canvas using the same method that I used for the photo. People are often confused when they see the grids because the lines form rectangles and not perfect squares. But as you can see, the lines are drawn up mathematically.

After drawing the lines, I pencil in the outline of the image and mark in any places where darker shading might be required.


Go to Part II.

Thursday, July 22, 2010

My New Favourite Salad


My friend, Pat, made this awesome bean salad a couple of weeks ago. I was so surprised that she pulled out a label from a tin of beans when I asked for the recipe. This recipe is seriously AMAZING and it is my new favourite!

The recipe is from a can of Unico beans.

Ingredients

  • 1 can (540mL/19 fl oz) black beans, rinsed and drained
  • 1 mango, peeled, pitted and diced
  • 1 sweet red pepper, diced
  • 2 green onions, sliced (I use 1/4 of red onion)
  • 1/4 cup fresh lime juice (or lemon juice)
  • 2 tbsp vegetable oil
  • 1 tbsp soy sauce
  • 1/2 tbsp red pepper flakes
  • 2 tbsp chopped fresh cilantro (optional)

Instructions

  • Combine the beans, mango, red peppers and green onions in a bowl
  • Whisk together lime juice, vegetable oil, soy sauce and red pepper flakes
  • Add the cilantro and toss lightly

Serves 4-6, or lunch for a week for just you!

Monday, July 19, 2010

It's Christmas in July!


It's Christmas in July on Etsy and I am having a sale in my shop!

Here are the great offers you will find in my shop from July 15-25!
*******************************************
Greeting Cards- 3 for $10 (Regular $4 each)
Two-in-One Cards- Buy 1, Get One for Half Price (Regular $8 each)
Paintings/Illustrations, Tags & Confetti- 10% off (excluding shipping)

I am also always interested in doing trades! Happy Christmas!

Friday, July 16, 2010

In Memory of My Aunt


It's been a bit of a sad day for our family. I got a call this morning to tell me that my Aunt Evelyn had lost her battle with cancer yesterday night.

My dad, who is part of a singing group that goes to the hospital, was able to see his sister one last time on Monday. He had a fairly good chat with her then. One of the other members of the singing group asked my Aunt if she was "ready to meet her maker". She told him she was very ready because she knew exactly where she was going.

She was always such a strong person; she will be sorely missed.

Sunday, July 11, 2010

Sunday Stampede

It's that time of year again. It's Stampede Season in Calgary, Alberta!

If you are unfamiliar with the Calgary Stampede, it is the 'Greatest Outdoor Show on Earth'. It was started in 1912 and this year it runs from July 9-18. The Stampede includes everything from rodeo events, fairground rides and outdoor concerts. It's a huge tourist attraction and certainly worth at least one visit.


In honour of this year's Stampede, I am featuring the work of a Calgarian Etsian and also a fellow member of my Alberta Etsy Team.

Sybillinart's shop offers a unique decoupage technique which is common in Europe. Having lived in France, she has first-hand knowledge of the technique and the beautiful items in her shop certainly show it. I definitely recommend browsing her shop and viewing some of the cute items she has in there!


Sunday, July 4, 2010

Sunday Spiral


This is a hairpiece from Amie Plante's shop. It is so artistic and eye-catching that I just had to share it! Isn't it gorgeous?

Amie is an artist living who lives and works in Rhode Island, teaching art to students of all ages.

The other items in her shop are equally artistic and lovely. I urge you to have a look!

Friday, July 2, 2010

Containers of Flowers :)


Remember those pots I did up on May 31? Well they're looking a bit different now! These poor little plants have survived so much. In the last two months we've had frosts and torrential winds and rain- okay so I babied them a little and took them inside a couple times -- but I'm so pleased that they didn't die!

Starting on the left with my geum; it has grown so much! I can't wait for it to start blooming; I've never grown it before and I can't wait to see the shock of red colour against that black pot!

In the middle is a pot I did up just last week. I had an empty pot and an empty space that needed filling so I bought some dusty miller and pansies. I didn't want to spend a whack load of money so I just bought 2 six-packs of plants (less than $5).

I am so pleased with my yellow superbells and purple nemesia (the green pot). Through all the crappy weather, the superbells never stopped and always looked good. They are definitely going to go on my 'green thumbs-up' list. You'd never guess that there's only two plants in that pot! I love the yellow and purple together!

In the blue pot, are my pirouette petunias and some pink alyssum. The petunias were so small when I planted them. They could barely hold up their blooms because the blossoms were about as big as the plants themselves! I had a leftover dusty miller last week so I plunked it into that pot. I think the silver against the pink looks ok for now. We'll see if they cooperate or not later...

Thursday, July 1, 2010

Happy Canada Day!


Happy Canada Day everyone! Now go out and enjoy the lovely weather!

My Blog List